

 I am so excited! Today, I put some curtains that I bought at Meijers. They are gold and green striped, and the material is very shiny. I decided that these curtains would go perfectly in my office, which is following the Mystic Victorian theme described in a previous post!
Hanging the curtains was entirely too exciting. I did not have a stud finder, so I tried to guess where to hang the curtains. I measured from the window to the mark, and drew a small circle (doing the same steps on the opposite side). My husband told me to drill a hole to place the anchors in. So, I started drilling but the drill would not move into the wall! Where did I go wrong?
1. I did not have my step stool (a friend was borrowing it), so I was standing on a kitchen stool (which also happened to spin).
2. I was trying to drill into a stud, and I am not strong enough!
3. I did not know what I was doing.
Finally, I gave up and called my friend Melissa from Evolving Eden over. She realized that I was trying to drill into a stud, but she was able to use her force to drill into the studs. We did not even need the anchors because there is no way the screws are coming out. Ok, so what is my advice for hanging curtains?
1. Get a stud finder-do not drill into a stud.
2. Hammer a nail into the wall to make a starting hole. Then, nail the anchor into this hole. If the hole is too small, use a larger drill bit to widen the starting hole.
3. Use an electric screwdriver to fit the screw into the anchor.
4. If you start drilling and it is not moving into the wall, you are on a stud. If so, find someone more experienced to drill for you. You can seriously hurt yourself if the drill slips.
Despite the amount of work, I love my new curtains! I plan to buy a matching pair to hang in front of the closet.

I also finally put out my new dragon that I bought honeymooning in St. Augustine, Florida!
Now that I have a plan for my kitchen and dining area, I wanted to also create an inspiration board for my office/sitting area. I love Victorian-style decor, and wanted to incorporate that feel into my room. I therefore decided to use very antique colors, focusing on champagne and sage green, but using dusty rose and deep purple as accent colors.
I want the feel of the room to be Victorian, but more of a modern feel rather than the uptight, proper feel of traditional Victorian rooms. To do this, I will to use a lot of solid colors, not print. However, I do want to use some typical Victorian materials such as silk, glass, wrought iron, pearls, and gold accents. But, I want to also give the room a mystical, "Enchanted Garden" feel so I plan to use lots of candles and flowers! Clockwise from top left: 1. Pillow from Target 2. Vase Sconce from Bed Bath and Beyond 3. Picture from BizBash 4. Sandalwood Fan from Favors by Serendipity 5. The Garden Room Picture from Ivan About Town 6. Purple Flowers from Photos of the Year 7. Modern Victorian Room from Homes Magazine 8. Tea light Chandelier from Country Styled Homes 9. Green Throw from Overstock.com 10. Asian Retro 11. Sheer Ceiling from HGTV 12. Purple Vase from LunaBazaar 13. Green and Champagne Room from Woman's Day
Look for updates on my room!
Love Damask? Can't get enough of it? One of the biggest raves in the wedding business right now (as well as home decor!) is the damask print. And since it is so popular, you can find damask print on just about anything!
But what is damask? The term "damask" was first used to descr ibe a certain type of textile that originated in the Byzantine and Islamic regions. The textile was unique in that a repeating pattern was woven so as to be raised above the fabric (usually silk at the time), rather than integrated into the fabric. After traders such as Marco Polo visited Asia, the popular weaving style moved to Europe and the Middle East. The term "damask" came from the city Damascus, since the city had become one of the major textile cities, exporting to Europe and the Middle East both.
 Today, people generally refer to damask as a particular print since not all damask products are woven, nor is the print always always raised as they used to be. In addition, the damask print is not one standard pattern. Some damask prints have a more floral design, while other damask prints are more geometric.
Since damask has become popular in home decorating, it can now be found easily! And, since damask is now made on cheaper materials as well, the average person can now afford to decorate with it.
Lamp from Amazon


Now that I have designed an inspiration board (see inspiration board: Old World Spain) for my kitchen and dining room, I wanted to start putting the room together. But where to start? Since I do not have much money, I decided to start by adding some wall sconces to my dining area. If you caught one of my early posts, I hung pictures of our honeymoon on the walls around the dining room table. But to start adding the Old World feel to the room, I decided to hang very masculine candle sconces to the walls, between the pictures.
To finish this project, I needed:
1. Nails
2. Hammer
3. Candle Sconces
4. Candles
I got my candle sconces from Walmart (only $8 at that!), but Target and Overstock.com also have some beautiful sconces as well.
Hanging the sconces was much easier than hanging the pictures. I found the middle point of the wall and made a pencil mark. Then, I had mark where to hang the sconces based on the heights of the pictures. I simply hammered in a nail at the center mark, and then slipped the candle sconce onto the nail.
Finally, I picked up some small pillar candles from Family Dollar. I love it! This project only took a few minutes but I love the end result.

For our honeymoon, my husband and I traveled to St. Augustine, Florida (I know...again with the honeymoon stories!). There, the historic buildings are made from such materials as gray coquina (a type of stone made from seashells) and other stone materials. However, the town's decor does not feel cold despite the amount of stone. Greenery is abundant across and inside the buildings, people eat within beautifully manicured courtyards with twinkling lights or torches, and the insides of buildings feature decor in bright colors of orange, red, blue, and yellow.
To bring ths romantic, yet colorful, feel into my own home, I created this inspiration board around the theme: Old World Spain. The main colors are a mixture of earth tones (gray, black, green, deep brown) and bright accent colors (particularly red and some orange). And, I wanted the feel of the room to be: Sophisticated , Romantic, Earthy, Soft, and Organic. What do you think?
Old World Spain

------------------------------------------------------------------------------------------------
Like this board? Have you decorated in a similar style? I would love to see you pictures and post your story online! Just hit the contact me button to the left.
I woke up this morning with the desire to make a design board for each of my rooms, hoping that the board would help organize my decorating ideas. While I like the idea of buying spontaneous decorations and accessories, I also want my rooms to look polished and carefully decorated. My friend Melissa might say this is due to my being a Capricorn. And a as a Capricorn, I must have a plan! So, I have narrowed down my room designing to 3 steps. Hope this helps!
Pick A Theme
One of the easiest ways to begin planning your room is to pick a theme for your room. The theme narrow your decorating focus. Below are a few theme ideas: 1. A Period Theme
-Medieval
-Gothic
-Victorian
-Colonial
-1950s or any other decade
1950s Living Room
2. A Regional/Cultural Theme
-French/Spanish/Tuscan
-Coastal/Tropical
-Mountain Lodge
-Country
-Asian Inspired
-Western style
3. Select a Focal Object
-Favorite piece of artwork
-Favorite flowers/veggies/herbs
-Seashells/Lighthouses
4. Colors
Maybe you simply want to base your room around a certain color or colors. Pick either your favorite colors or use colors to create a particular mood:
Green: earthy, organic, natural
Blue: calming, tranquil, peaceful
Purple: mysterious, luxurious
Red: modern, sexy, spicy, exciting
Orange: excitement, enthusiasm
Yellow: light, airy, fresh, happy
Pink: cute, quaint
Black and White: chic, sophisticated
Identify the Feel of the Room
Now that you have a general idea about the theme/colors for your room, make a list of words that you feel should describe your finished room. Should it be calm and soothing? Or sexy and modern? Victorian and earthy? Sophisticated and chic? The main idea is that you should begin to envision how you want to feel when you spend time in your room, and doing so will help clarify your project. For example, if you want to decorate a room using a coastal/tropical theme, do you want your room to feel like a beach party, a nautical boat, or a serene beach retreat?
Identify Relevant Materials
Based on your theme and descriptive word list, what decorating  materials would best convey your theme? For example, if you want to decorate with a Victorian theme, then you may want to incorporate silk, pearls, lace, wrought iron, dark woods, and flowers. Or, if you select a Tuscan theme, why not decorate with wine bottles, stone materials, vines, and terra cotta like in the Tuscan Kitchen to the right? Make a list of the materials that would bring out your theme, and then keep them in mind as you look for paint, furniture, and decorations.
And be creative! If you want to create a herb inspired kitchen, then think of unique items to decorate with. Instead of buying a vase for your kitchen table, buy a small planter. Paint it your desired color, tie a ribbon around it (or simply glue one if you don't want the bow) and plant a flower herb. Here is a starter list of items to obtain for your rooms:
1. Paint/Wall Treatment
2. Wall Art
3. Window Treatments
4. Rugs
5. Lighting
6. Storage
7. Furniture
8. Decorations and Accessories
9. Kitchen Utensils/Dinnerware
Happy Decorating!
 Designing a wine-inspired kitchen or dining room? Then take a look at this unique decor idea from The Country Porch! These wine bottle candelabras not only hold votive candles, but also function as a vase.
Simply insert the bottle stopper into a special or decorative wine bottle. Happy decorating!
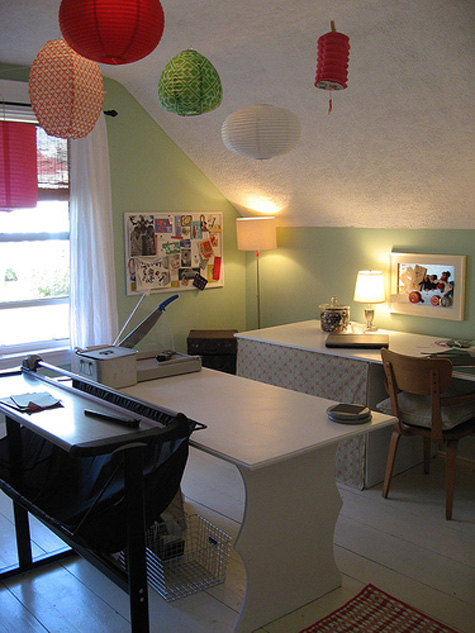
One of the newest craze in the wedding and decorating world is paper lanterns. Besides being affordable, paper lanterns are very versatile, coming in just about any size, color, shape, and texture you need. What's more, they can be used in a variety of ways: as overhead lights, table centerpieces, or as cute hanging mobiles in the nursery.
One of the things I love the most about paper lanterns is that they can be used to set a variety of different moods in your home and garden. Check it out:
 Porch Lanterns found at The Urban Hippie
 Nursery found at The Decorpad

Modern and Sexy
 Sophisticated and Chic


 White Lily Lanterns at Good Things Wedding Favors
 Lanterns over the Pool at Hostess with the Mostess
Lunabazaar
The Paper Lantern Store
Party Lights
--------------------------------------------------------------------
Have you decorated with paper lanterns? If so, I would love to post
your pictures, comments, and stories! Contact me.
 I decided to start off my decorating experience with an easy project: framing pictures. I hate empty walls with a passion and my dining room (more like a corner) is very boring. Although we love our pub table, we rarely eat at it.
I want our dining room to be romantic and an enjoyable place to sit. However, I wanted the romantic feeling to be very personal and meaningful to both myself and my husband (who tends to frown on most romantic decorations). So, I decided to begin revamping the dining room by framing some photos from our honeymoon in St. Augustine, Florida. Most of the pictures I printed were of our favorite spot: the Castillo de San Marcos.
Materials
1. Picture Frames (with or without mats)
2. Printed Pictures
3. Glue Dots/Tape
4. Nails (I used wire nails)
5. Leveler
6. Hammer
7. Measuring Tape
A few notes about materials:
Have fun finding your picture frames! Think about the style and mood you are trying to set. Do you want the focus to be the pictures or the frames? If you want people to focus on the pictures, buy simple and clean frames that do not detract from your art. Or, if you want to draw attention to the frames as well, find frames with funky patterns or colors. Check you local hobby stores, flea markets, or go online to look for frames at stores such as Walmart (where I purchased my frames), Target, Amazon, Overstock.com, or Ebay. Here are a few online finds I also loved:
Another great purchase is glue dots. Glue dots are removable round sticky dots that will hold your pictures firmly on the mat. They are a great investment for many other projects such as scrapbooking, invitation-making, or other paper crafts.
Finally, while a leveler is not mandatory for this project, it does come in useful for determining that your picture frames hang straight.
Framing the Pictures
Framing pictures is pretty straightforward, but here are a few tips.
1. First, clean the glass and make sure the mat (if you have one) is free of dust.
2. Use glue dots or tape to secure the pictures to the mat. Doing so prevents the picture from sliding, saving you a lot of time and frustration.
3. Make sure you tighten the latches on the back to ensure your pictures do not slip out! Easy Hanging Guide
After framing the pictures, I needed to hang them. Here is an easy guide for hanging pictures:
1. Mark the center of your wall. I first measured my wall (46 inches). I then divided 46 inches in half to find the center of the wall (23 inches). To remember the center, I put a pencil mark 23 inches from the wall.
2. Mark the Center of Pictures. To hang two pictures, divide the center mark by two. Since I wanted to hang two pictures on each wall, I divided the center point (23 inches) by two (which is 11.5 inches). I then measured 11.5 inches outward from the center mark (11.5 inches to the right and 11.5 inches to the left). I marked each side with a pencil. Thus, the center of each picture will hang at 11.5 inches from the center point.
3. Mark the Desired Picture Frame Height. I then decided on the height of my pictures (39 inches from the chair rail) and measured from the chair rail (or the floor if you do not have a chair rail) to 39 inches and marked that spot with a pencil. Make sure to place the mark in line with the 11.5 mark made earlier.
4. Mark the Nail Hole. Most picture frames have a nail holder lower than the top of the frame. To mark the nail hole, I measured from the top of my picture frame to the nail slot on the back of the frame. The hanger on the back of my picture frame was 2 inches from the top of the picture frame. So, I measured two inches down from the 39 inch mark (so 37 inches) and made a pencil mark. Once again, make sure that the pencil mark lines up with the pencil mark marking 11.5 inches from the wall.
5. Insert Nail. I nailed the nail into the wall at the 37 X 11.5 inch mark, leaving a small gap between the nail head and the wall.
6. Hang the Picture. Test the straightness of your picture with the leveler. If the bubble is between the two lines, then your picture is straight.
7. Repeat!
I loved this project! It was a simple but effective start to decorating my dining area.
----------------------------------------------------------
If you were inspired by this post and completed your own project, I would love to see your pictures and post them on the blog!

Hello and welcome! My name is Crystal, a Political Science graduate student and, more importantly, a newlywed. In fact, I have been married almost three weeks. While I do not miss the wedding stress, I loved the wedding planning! I read blogs and searched the internet daily looking for the perfect DIY projects and wedding details to create a very personal wedding. The greatest complement I received was, “Everything turned out beautiful, this wedding was….so you!” Now that the wedding is over, I still miss the planning, designing, and creative effort that I put into that event.
I therefore write this blog with a specific goal: to apply the same wedding planning process to decorating a home. Decorating should reflect the people within it: their favorite colors, themes, and personal touches. To achieve this goal, I will create decorating inspiration boards, search for interesting and unique decorating products, and gather interesting DIY projects (often borrowed from wedding websites-heck, I wanted some of those decorations for my own home!). Some of the decorating ideas will be ones I plan to use in my own home (which is sparsely decorated at the moment), but many of the posts will be cataloging ideas other people may use to express their personal decorating style and create their own, personal sanctuary.